Tuesday, 1 July 2014

A Distressed Kingfisher

Hello all! Well, it's the first of July already - here in the UK, we've had the summer solstice so we've passed the longest day of the year, but hopefully there will be some glorious warm and sunny weather to keep us going as the days gradually get shorter. 
 
The most recent challenge over at Linda Ledbetter's Compendium of Curiosities Vol 3 asks us to turn to page 39 of Tim's latest book of loveliness and give the technique described there a try.
 
Well, I don't have any appropriate stamps by Tim that would suit this technique, but I have just acquired the latest Bird Stamps from Sheena Douglass and was dying to ink up the kingfisher image.  I love kingfishers, their colours are so magnificent and regal - so different to many of Britain's birds.  Don't get me wrong, we have some glorious birds, but not many that are so obviously, well, gaudy!  The kingfisher sits on a branch overlooking a stream like a dandy at a fancy dress party!!!!  Not that I've seen a lot of them mind you (kingfishers, not dandies!).  You'd think that such a colourful bird would be an easy spot - not a bit of it!  The most I've seen of a kingfisher is a flash of blue and orange as it's flown away into the riverside trees! 
 
Back to the challenge. I stamped the kingfisher from the "King for a Day" stamp set using Black Archival and used the Page 39 technique to colour him in (colours used were Broken China, Spiced Marmalade and Pumice Stone).  I was delighted with the result - I was worried that the technique would result in a washed-out image, but the colours came through really strongly.  


The background was made using the same technique, but on a much larger scale.  Broken China and Mowed Lawn were painted on to a flat 5x7 inch canvas which had been primed with white gesso. 


Once the whole surface was covered, I dripped some more wet Mowed Lawn down the canvas to create the impression of a weeping willow alongside the stream.  I then went around the edges with some Frayed Burlap Distress Ink to frame the image.


I stencilled through Tim's Rays Layering Stencil with Scattered Straw Distress Ink and then used some texture paste mixed with Scattered Straw through some sequin waste to create the "centre" of the sun.  I stencilled through a twiggy mask with Walnut Stain and randomly stamped some swirls over the canvas with black archival ink which I had "blotted" first on some scrap paper. I also added a couple of bits of tissue tape to the edges of the canvas. Unfortunately for the purposes of blogging, I was so enjoying what I was doing that I clean forgot to take photos along the way!!  (You can just about see the stencilling in the background of the finished piece at the bottom of this post.)

I used a die-cut branch across the panel, but it seemed a bit flat, so I added some UTEE "dribbles" over the top.  These resulted from cleaning out my Melt-Pot after my last session of playing - rather than waste the residue left in the pan, I dribbled it over my non-stick sheet to create some gorgeous shiny scribbles, which I knew would come in handy one day!!!  I snipped some bits off and stuck them over the flat branch - that's better!
 
 
I cut out the coloured kingfisher, and gave him a special crown from the same stamp-set before mounting him on his perch with 3-D foam.
 
I stamped the sentiment onto a left-over painted background and used one of Tim's pins to adhere it to the canvas. I added a little fish charm to the kingfisher's bill as if he'd caught it from the stream (some imagination required here as the charm is a sea fish and the kingfisher is a freshwater bird!)


I added some embellishments made from polymer clay that I found lurking in my "bits box" to the bottom right corner.


Finally, when I was searching though my melt-pot remnants, I found a pendant made from silver and black UTEE and poured over a texture tread, which filled the gap at the top of the canvas.


And voila!  My entry for the CC3 Challenge 5 - I hope you like it as much as I enjoyed making it.
 
 
Thanks for visiting.
 
Keep Crafting!
 
Jean


Wednesday, 25 June 2014

Sing Little Birdie!

Well, hello again - 2 blogs in one month - things are improving!!

I managed to grab a spare afternoon to get crafty and I made a tag using some of my Crafty Individuals stamps.  Over on the Crafty Individuals blog, the challenge this month (June) is "Tag You're It!" and the task is to make a tag using their stamps.  I love Crafty Individuals - their attention to detail is amazing and they produce some lovely images in their stamps; the hardest part of this challenge is to choose which images to use!!  I finally decided on some birdies!


I started with a watercolour paper tag that I had already coloured with the residue from my stencil used as the background for my Tim's Tag for June. The image wasn't as detailed as it was for my Tim's Tag, but it was too nice to ignore!
 
 
I stamped the little row of birds using CI-230, cut them out and then coloured them with Broken China, Squeezed Lemonade and Frayed Burlap distress inks pressed onto my mat and spritzed with water and then painted on. 
 
 
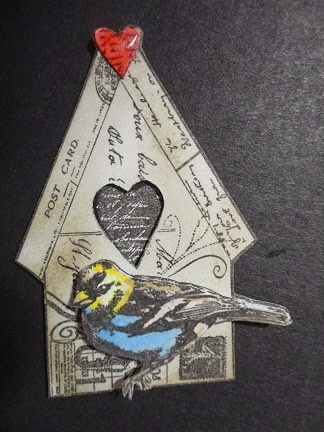
I stamped the bird house twice using CI-218 and then cut out the main image from one and just the bird and the little heart on the top from the other.  I coloured the house with Old Paper distress ink and a little Frayed Burlap and the cut-out bird with the same distress inks as I used for the chicks and then highlighted some of the colours with a flex-marker.


I coloured the heart with a Barn Door distress marker and then covered it in glossy accents.


I random-stamped a swirl from an old stamp on to the tag using Wild Honey distress ink and cut out a flourish from my Tonic Verdant Vines die and glued it to the tag.


I cut a branch from the Spellbinders Cherry Blossom die and glued this across the bottom of the tag and then put the row of little birds on the branch with 3-D foam pads.

 
I then 3-D'd the larger bird and glossy heart on to the bird house.
 

I cut the corner off a metal embellishment and then "aged" it with Shabby Shutters and Broken China Distress Paints and added it to the top of the tag.  I then glued a short length of old fine chain so that it looked as though the bird house was hanging from the filigree corner. 


I mounted the bird house on to the tag so that it looked as though the chicks were looking up a their mum for instructions.  I finished it with a bit of dyed seam binding, a few hand drawn musical notes and a hand written "Sing".


So, there you have it - my entry for this month's Crafty Individuals Challenge!
 
Thanks for looking and Keep Crafting!

Jean

Monday, 16 June 2014

Tim's Tags of 2014 - June


Well, I finally found some time to play - I have been crafting recently, but mostly to meet family and friends' birthdays, enjoyable, but not necessarily blogworthy!
 
I had time today to have a go at Tim's Tags for June. I used Tim's Doily Layering Stencil and Distress Inks: Squeezed Lemonade, Shaded Lilac, Mowed Lawn, Peacock Feathers (my all-time favourite) and Picked Raspberry.

 
 I cut the whole tag from watercolour paper and inked the Stencil as per Tim's instructions. I misted it and then pressed it on to the tag. I must say, I was very pleased with the way in which the background came out - the colours were lovely and the effect was very summery - thanks Tim!


I wanted to do use different images from Tim's original, rather than slavishly copy his idea, but I didn't have any more of his stamps that would have fit, so I compromised by using the Rise Above sentiment from Sheena Douglass's latest bird stamps, and Tim's Butterflies from his Papillon Collection.
 
 
I don't have the framelits set, so I coloured in the second stamped images and cut them out by hand.
 
 
After I'd misted the Stencil to make the background I mopped up the residue with another piece of card and then cut out a few layers of a Spellbinders Vintage Floret die from the coloured card.


I assembled the flower, curling the petals a bit, and set it on some old watch parts - there is a tiny cog from an old watch in the middle of the flower too, and, although you can't see it here, there is a bit cut from a watch spring  hanging under the flower.
 
 
I then added a "messy bow" made from seam binding dyed with the same distress colours and was ready to add my top layer of butterflies, but they looked a bit dull compared to the bright background, so I gave them a great dollop (love that word) of Glossy Accents - that worked beautifully!
 
 
In these photos you can see the layering of the butterflies and their lovely gloss.


So, voila! My entry for Tim's June tag.
 
Hope you've enjoyed my post, and apologies for anyone who's been waiting for a second post (you know who you are - C!).  Hopefully I won't leave it so long before my next blog entry!
 
Keep Crafting!!!
 
Jean


Wednesday, 30 April 2014

Is Anybody There?

 
 Well, Hello World!  Wow, this is my very first ever blog post - after years of reading other peoples' wonderful blogs, I've taken the plunge and started my very own!

Now, I know that there may be no-one reading it (yet), but I'm not worried. This is going to be my creative outlet, and even if no-one looks at it, I will still be able to put my creations out there. Although, it would be nice if someone were to visit from time to time.

My very first post is my entry for this fortnight's challenge (number 4) at A Vintage Journey - Spring Flowers. 

For this challenge I decided I wanted to show the contrast between spring flowers and the winter that they signal the end of (if that makes sense!). Tim's style was perfect for this, as you can grunge down or bling up as appropriate.  I chose to create a box and decorate it in a vintage style and then fill it with vibrant spring flowers.

I'm afraid the picture is a bit blurred but I think you can see the effect.

I started off by making a box from various Tim's papers. The box is 4 inches square and 1.5 inches deep. The actual colour is a little darker than shown (more brown really!). I then decorated it with some of Tim's papers, stickers and other bits and pieces from my stash. All given the distressed look of course!  The effect I was hoping for was a vintage style box which held a lovely bright surprise when opened.
 
The inside of the box is lined with Tim's Distress Core-dinations (Wild Honey) and filled with flowers all made using the Tattered Flowers Dies (Bigz, Decorative Strip and Movers & Shakers) and cut from the (now discontinued) Vintage Shabby papers. I also cut some green leaves from the Spring Greenery strip die and added these, along with a few flutterbuys. The lid was trimmed with a bit of a Tattered Lace strip cut from the same paper as the flowers.


Hopefully, you can see the effect I was trying to achieve.
 
Well, this post has taken me an absolute age to compose - I suppose I will get used to it! If anyone knows of a very simple guide to using blogger to customise your page, I would be very grateful if you could send me a link!!!
 
If you do visit, I would so love it if you would leave me a comment. Thanks for visiting and see you next time.
 
Jean